Introduction:
Welcome to our guide on “Creating Custom Events in GA4 via GTM.” This guide shows you how to track what users do on your website step by step. Custom events in Google Analytics 4 (GA4) help understand user actions, and using Google Tag Manager (GTM) makes setting up these events easy. From starting your setup to making everything work smoothly, this guide makes it simple to follow and helps you gather useful info to make your website better.
Step 1: Create Account in GTM and GA4
- Google Tag Manager (GTM):
- Sign in to Google Tag Manager or create an account if you haven’t already.
- Set up a new GTM container for your website.
- Google Analytics 4 (GA4):
- Go to Google Analytics and create a new GA4 property for your website.
- Obtain the GA4 Measurement ID required for linking with GTM.
Step 2: Link GA4 with GTM
- In Google Tag Manager:
- Access the created GTM container.
- Navigate to the ‘Admin’ section.
- Under ‘Property’, click on ‘Google Analytics Settings’.
- Add a new tag configuration, selecting ‘Google Analytics: GA4 Configuration’.
- Enter the GA4 Measurement ID obtained earlier.
Step 3: Prepare HTML and JS Code to Send Event Data
- In your HTML and JavaScript code:
- Define specific user interactions or actions you want to track (e.g., button clicks, form submissions).
- Implement the JavaScript code to send event data to the data layer (e.g.,
dataLayer.push()).
<!DOCTYPE html>
<html lang="en">

<head>
  <!-- Meta tags and title -->
</head>

<body>
  <!-- Google Tag Manager -->
  <!-- GTM scripts and configurations -->

  <!-- Product Card Section -->
  <div class="product-card">
    <!-- Product details -->
    <img src="shirt.jpg" alt="Product Image">
    <h2>Product Name</h2>
    <p class="price">$99.99</p>

    <!-- Buttons Section -->
    <div class="buttons">
      <!-- 'Add to Wishlist' Button -->
      <button class="wishlist-btn" id="addToWishlistBtn">Add to Wishlist</button>

      <!-- 'Add to Cart' Button -->
      <button class="cart-btn" id="addToCartBtn">Add to Cart</button>

      <!-- 'Share' Button -->
      <button class="share-btn">Share</button>
    </div>
  </div>

  <script>

    // 'Add to Cart' Button Click Event Listener
    document.getElementById('addToCartBtn').addEventListener('click', function (event) {
      sendGtmEvent('AddToCart', 'ABC123', 'Black Jerkin', '99.99', event.target);
    });

    // Function to Send 'Add to Cart' Event Data to Data Layer
    function sendGtmEvent(eventName, productId, productName, productPrice, clickedElement) {
      dataLayer.push({
        'event': eventName,
        'productId': productId,
        'productName': productName,
        'productPrice': productPrice,
        'gtm.elementClasses': clickedElement.getAttribute('class'),
        'gtm.elementId': clickedElement.getAttribute('id')
      });
    }
  </script>
</body>
</html>
Step 4: Create Variables in GTM
- Within GTM:
- Navigate to ‘Variables’ and set up Data Layer Variables for capturing event data pushed via JavaScript.
- Configure additional variables if needed for dynamic data retrieval.
Step 5: Create Triggers in GTM
- Access the ‘Triggers’ section in GTM.
- Create triggers based on specific user actions (e.g., clicks, form submissions) to fire the custom events.
- Define trigger conditions such as click classes, IDs, or other relevant parameters.
Step 6: Create Tags in GTM
- Navigate to ‘Tags’ in GTM and click on ‘New’ to create a new tag.
- Choose the appropriate tag type for GA4 and set it to ‘Event’ type for custom event tracking.
- Configure the tag settings, specifying the event name and parameters.
- Associate the created tag with the previously defined triggers.
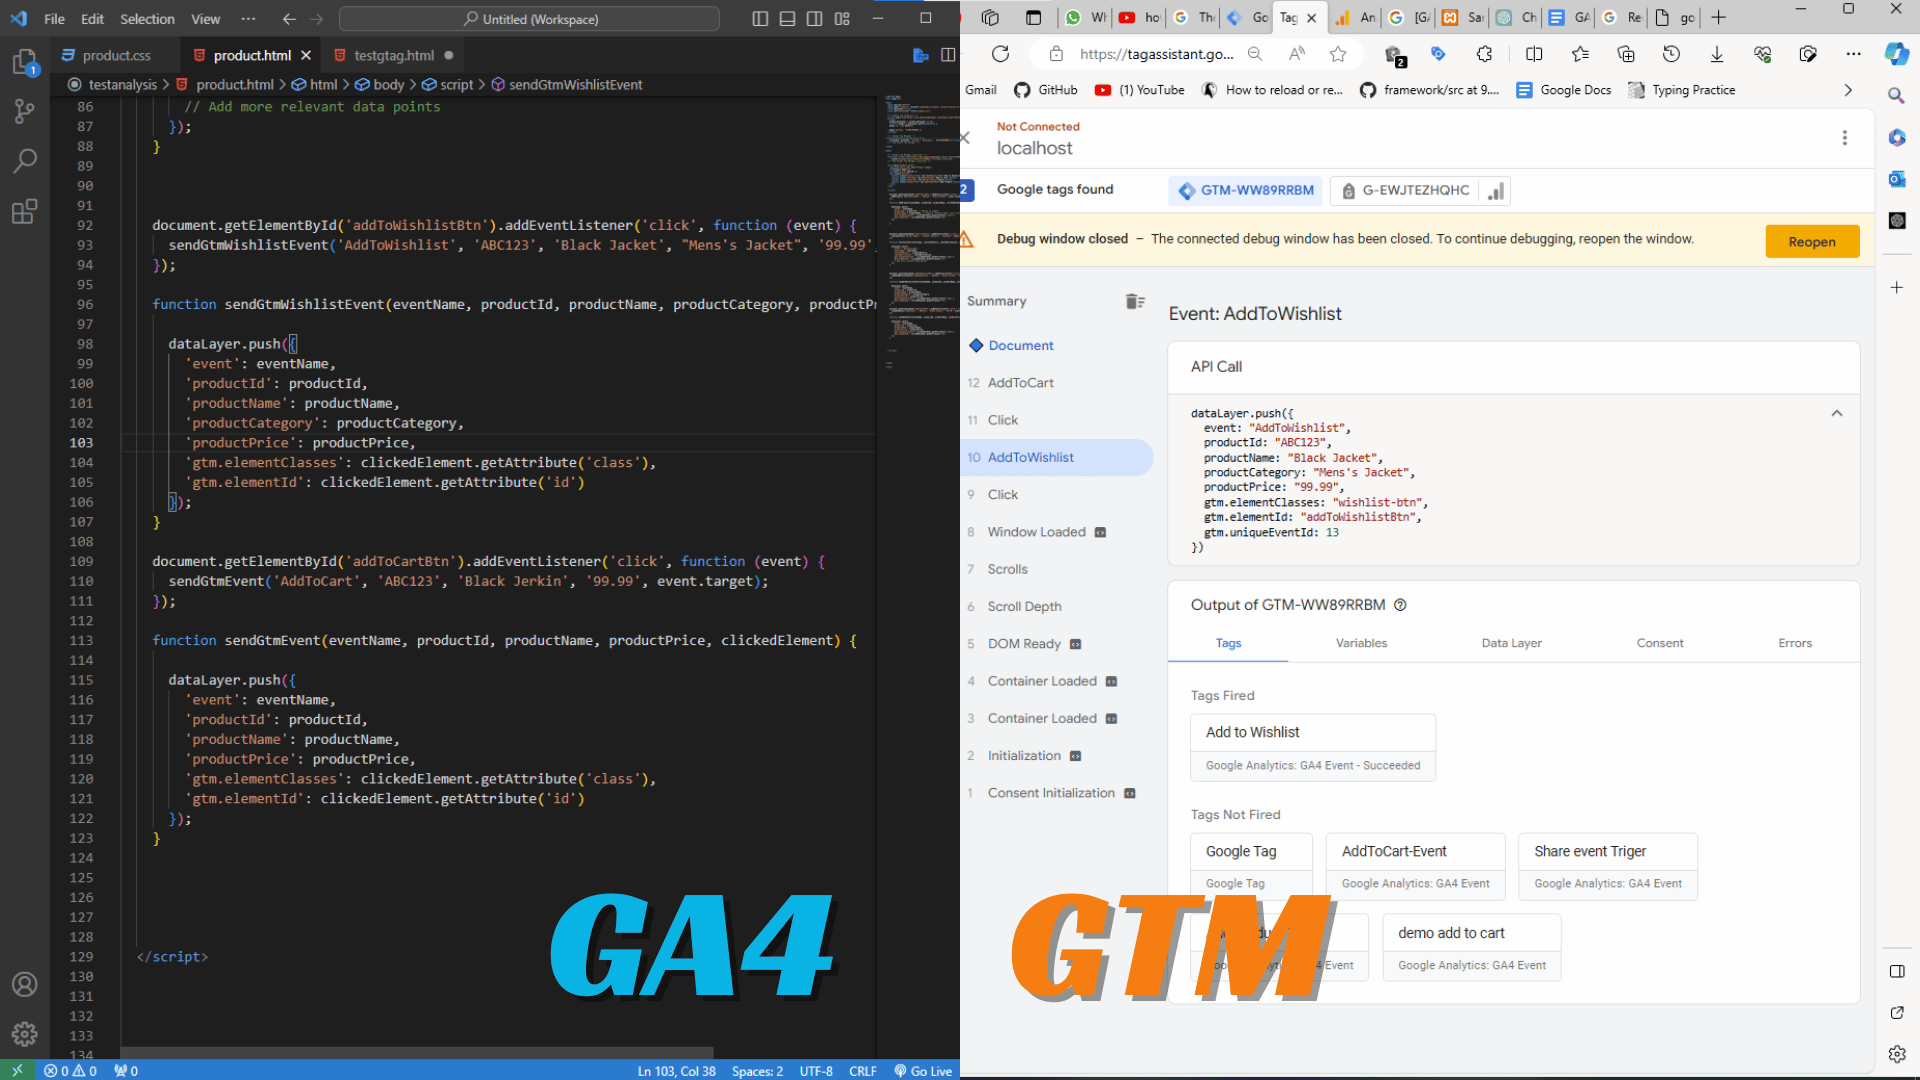
Step 7: Test in GTM
- Enable the Preview mode in GTM.
- Test the website by performing the specific actions that trigger the custom events.
- Verify in the GTM Preview mode that tags fire as expected and send the event data to GA4.
Video Tutorial: Creating Custom Events in GA4 via GTM
In this section, embed or link to a video tutorial that provides a visual walkthrough of all the steps outlined in the guide. You can include:
- A brief introduction to the video content.
- The video itself demonstrates the step-by-step process visually.
- Additional commentary or explanation to complement the video content, highlighting key points or details.
Conclusion:
Through “Creating Custom Events in GA4 via GTM,” you’ve learned to understand your users better. By adding these custom events, you now know what they like and how they use your website. Remember, this info is key to improving your website and making it better for your users. With this guide, you’re all set to use GTM for tracking custom events in GA4 and make smart choices for your website’s success.